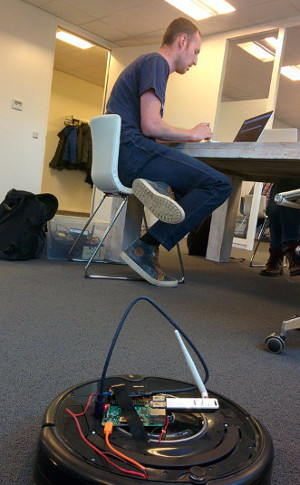
 Every couple of weeks we organize a hack-day at work. Being a (Java) software consulting company we usually work on exploring new Java frameworks or we contribute to open source projects. But more and more we step out of just software and bring Raspberry Pi’s and other hardware. Another example where we hacked on hardware is playing with Software Defined Radio (SDR), my colleague Bert Jan did a talk about this at Devoxx 2015.
Broken Roomba
A couple of days before our last hack-day my wife was carrying our old ‘broken’ Roomba vacuuming robot. Most vacuuming parts were worn down and the front wheel keeps dropping out of its socket. She was going to throw a robot out! I can’t let this happen, I have to save the poor bastard.
So I started to do a little research. I’d heard about the Roomba Create before. It is a STEM-version of their vacuuming robot, for hacking purposes. It doesn’t have the cleaning parts, instead of has more connectors, made especially to be hacked/improved, it is the perfect base for your own little robot! I was very pleased to find that even my 500-series Roomba has a hidden mini-DIN connector that allows serial communication. iRobot provides a full listing of all the possible commands and outputs, which is a great thing!
Connecting a Raspberry Pi
Here is what my idea was: Take a mini-DIN cable, connect it to a Raspberry Pi and drive the Roomba myself! But I quickly run into two problems:
- How do I connect the Raspberry Pi to a DIN cable?
- How do I power the Raspberry Pi?
After some research I was able to solve both of the problems.
Mini-DIN to Raspberry Pi
After some research I found out some good and some bad news. First the good news, the Raspberry Pi has an UART TX and RX pin. These can be used to communicate with the Roomba without any effort.
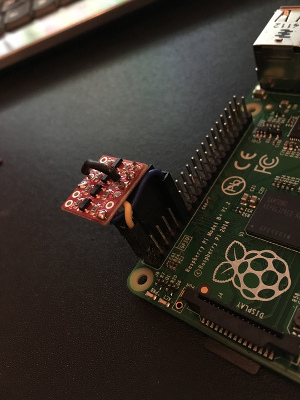
The bad news? The Roomba has logic pins that have 0-5v and the Raspberry Pi has 0-3.3v. You can’t directly combine the two together or you’ll risk blowing a fuse on the Raspberry Pi. There is however a pretty simple solution, that is to use a Logic Level Converter. This is a small board that you give 3.3v + GND on one end, 5v + GND on the other end. Now it has four logic pins left that can be used to connect 3.3v logic to 5v logic bi-directionally.
So with a bit of creative freeform-soldering I ended up with the following extension to my Raspberry Pi:

The only thing left to do next is to connect the right DIN-wires to the Raspberry Pi. But luckely the documentation provided by iRobot had very clear images showing all the mini-DIN pins and what they do.
Powering the Raspberry Pi
The next challenge was actually power the Raspberry Pi. The Roomba has a battery pack, 16-17v, so that would be perfect. This seemed to be an easy challenge initially because the DIN-cable also provides access to the battery pack. But just before I hooked the Raspberry Pi to the (unregulated) battery wires of the DIN cable I found that there are actually some fuses between the DIN connector and the battery pack. The Raspberry Pi would draw too much current for these fuses!
Next I opened up the Roomba completely. Just below the ‘Dock’ button are two big pads directly connected to the battery pack. I soldered two wires to these pads. This gave me 16v (without the fuses) to power the Raspberry Pi. But how do I step this down to the 5v needed by the Raspberry Pi? I connected the wires to a UBEC and soldered a mini-USB cable to the output. Connected to the Raspberry Pi and… it worked like a charm!
Programming the Roomba
When we connect the Raspberry Pi to the Roomba using the DIN cable, it starts to play weird error-beeps. This is because by default the Raspberry Pi writes all console output to the serial connections (!). Please read this link to disable it.
Like I said, the serial commands needed to drive the Roomba are perfectly documented. Using the GNU RXTX library (RXTXcomm.jar) we can write the following Java code:
    // On the Raspberry Pi the Serial communication pins are connected to /dev/ttyAMA0
    CommPortIdentifier portIdentifier = CommPortIdentifier.getPortIdentifier("/dev/ttyAMA0");
    if( portIdentifier.isCurrentlyOwned() ) {
        System.out.println( "Error: Port is currently in use" );
    } else {
        CommPort commPort = portIdentifier.open(this.getClass().getName(), 2000);

        if( commPort instanceof SerialPort) {
            SerialPort serialPort = ( SerialPort )commPort;
            serialPort.setSerialPortParams(
                    115200,
                    SerialPort.DATABITS_8,
                    SerialPort.STOPBITS_1,
                    SerialPort.PARITY_NONE );

            InputStream in = serialPort.getInputStream();
            OutputStream out = serialPort.getOutputStream();

            ( new Thread( new SerialReader( in ) ) ).start();
            ( new Thread( new SerialWriter( out ) ) ).start();
        }
    }
Now we can send commands to the OutputStream, like documented. Using this I was able to drive the Roomba through SSH to the Raspberry Pi from my laptop!
For example, we can do the following:
    // Write imperial march as song '0':
    write(out, 140, 0, 9, 57, 30, 57, 30, 57, 30, 53, 20, 60, 10, 57, 30, 53, 20, 60, 10, 57, 45);
    // Play song '0':
    write(out, 141, 0);

    ... snip ...

    private void write(OutputStream out, int... data) throws IOException {
        // Sigh, unsigned Java:
        byte[] output = new byte[data.length];
        for(int i = 0; i < data.length; i++) {
            output[i] = (byte)(data[i]&0xFF);
        }
        out.write(output);
    }
If you remove the DIN cable, it’ll still function perfectly as cleaning robot. So now I have a Star Wars bot to program during the day, and a cleaning robot at night.
Happy hacking!

